Thursday, October 25, 2012

Easy Halloween Cards

When I was first married my mother in law encouraged me with cards for every holiday. It was a tradition I soon adapted (for immediate family members - it's not a huge undertaking like Christmas cards are) in hopes that it would encourage the recipients too. Now that I'm getting crafty (not that I have a clue as to what I'm doing) I've started making some of my own cards. Hopefully folks will like the personal touch and hopefully, with time and practice, I'll get better at it. But I thought you might like to see how easy card making can be. With some blank card stock, an orange sharpie, a black ink pad and $1 stamp from Michaels I was able to make this year's Halloween cards.

I started using my regular card writing script (freehand quasi-calligraphy). The card stock was cream instead of white and I guess that was enough to make the orange marker look more red than orange but I still think it's cute and Halloween-y.

Then tried patterning my writing after the scrapbook page Halloween greeting below. I didn't quite achieve their look but it was fun trying. We have two black cats so I liked the black cat stamp and hope our recipients like it too. I added orange dots to the stamped cats eyes to give them a more Halloween-y feel.

If you made your own Halloween cards and posted photos I'd love to see them! Happy Halloween and merry crafting!

Wednesday, October 17, 2012

Halloween Pumpkin Recycled Egg Carton Craft

I made this cute Halloween pumpkin out of a recycled egg carton (the cardboard kind) and set it on top of some extra upside-down Halloween colored cupcake wrappers (I used three so they'd be strong enough to support the pumpkin). The stem is made from a pipe cleaner and I used basic acrylic paint for the pumpkin (orange for the body and black for the facial features). It was a relatively quick and easy project. The only time suck was waiting on the orange paint to dry before painting the black Jack-o-lantern face on the pumpkin. I had planned to make three of these for our dining room holiday display nook but decided to give it to a friend instead (the photograph was taken in her house where she'd placed it in her foyer).

Happy October and Halloween everyone!

Thursday, October 11, 2012

Craft Room Inspiration


Someday, I'd love to have my own beautifully organized craft and hobby room. Until then I'm inspired by my friend Janet's room. You can see my virtual tour of her super organized craft room here. Is your craft room/area organized? I'd love to hear about it or see pictures if you've posted them on the web. Please share!

As always, I wish you happy crafting!

(Full link just in case you need it: http://lovejoyandpeas.blogspot.com/2012/10/janets-super-organized-craft-hobby-room.html)

Saturday, September 29, 2012

Halloween Cat Dishcloth

Image source
I totally have to make One Crafty Mama's Halloween Cat Dishcloth. I'll likely make it in vanilla or blue yarn because that's what I have on hand in cotton but if I love it as much as I think I will I'll buy some orange and black yarn and make two more of the little dishcloths / washcloths. What a fun little knitting project for Halloween (or any time of the year if you love cats)!

You can find the original post with pattern here.

Happy crafting!

Source: http://onecraftymama-2011.blogspot.com/2011/09/halloween-cat-dishcloth.html

Wednesday, September 26, 2012

How to Make an Easy Clothespin Wreath for Fall, Thanksgiving or Harvest

Over a year ago I saw a cute clothespin wreath somewhere (maybe in a Martha Stewart magazine?) and decided to make my own version as a thankfulness wreath. Now that I see it against my white door I wish I'd painted the clothespins yellow instead of white but other than that I'm pretty happy with the wreath. You don't even have to paint the clothespins if you don't want to but I did because the marker bleeds some on the unpainted wood and looks nicer on painted clothespins. Here's how to make your own.
  • Cut out a donut shape for your wreath base (I used a recycled priority mail envelope for mine; it was handy and it was already white so I didn't need to paint it, saving me a step). I recommend making the width about the same or slightly less than your clothespin grip depth (so your clothespin has the maximum amount of cardboard to grip but isn't sticking out into the middle of your wreath).
  • Clip your clothespins all around your wreath until you're happy with the arrangement. I recommend using a multiple of three if you are going with my design.
  • Spray paint your clothespins your desired color, following the directions on the can. You could also use acrylic paints if desired.
  • Wait until after the wreath is completely dry. 
  • Using three different colored markers (I used brown, orange and red for a fall/harvest/thanksgiving theme), write something that you are thankful for on each clothespin (this could be a fun family activity).
  • Embellish your wreath as desired. I used leftover sunflower and scarecrow stickers from last year's wreath. I also cut out a rectangle from another part of the recycled priority mail envelope, used a red marker to create a border around the edges and wrote "Thankful" in the middle and then affixed it to the wreath with double sided tape.
  • Tie a ribbon around the top of the cardboard wreath form and securely knot it in a bow for hanging.
Happy autumn and happy crafting, dear readers!


Saturday, September 22, 2012

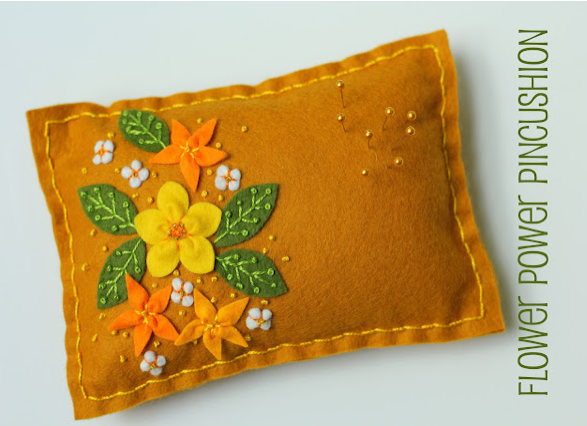
Flower Power Pincushion

Image source
The Sewing Loft Blog has a tutorial for this cute flower power pincushion. When I get around to making mine I'll likely use a red background and pink and white flowers but I absolutely love her idea. Of course. first I'll need to learn how to embroider, make a french knot, and embroider with beads but in the meantime I can admire her pretty pincushion. Happy crafting and happy National Sewing Month!

Source: http://thesewingloftblog.com/2012/09/20/nsm-flower-pin-cushio/

Monday, September 10, 2012

Cute Cat Magnet Plastic Canvas Craft

This is my very first plastic canvas craft using yarn. I adapted it from a kit pattern and I love how it looks on our refrigerator. Most especially because you can't see the mangled back side of it.

Plastic canvas lessons learned:
  • You count the bars not the holes/boxes when trying to follow a plastic canvas craft pattern
  • It's better to work an area at a time than to go back and forth and wind up with a tangled yarn mess
  • If I ever have another tangled yarn mess on the back (likely as I'm still a newbie at this) I could cut a piece of blank canvas before finishing and sew it to the back part of the front piece to hide the mistakes before applying the magnet strip (thanks Kelly!)
  • It really is better to keep your yarn strings to manageable lengths because it gets really tangled if your piece is too long
Do you do plastic canvas? Do you have an tips or lessons learned to share? I'd love to hear them! I thought this was a really fun project and I look forward to doing more plastic canvas crafts in the future. Happy crafting!